


We love our Hive system. Over the winter it has been excellent for being able to control our heating remotely, turning it on before we get home or even giving it a boost from the comfort of the sofa. Until recently we had been massively underusing the capabilities of the system, that is until we added the Hive Active Smart Plug and the Hive Smart Dimmable Light Bulb.
We have been looking at improving our home security with a security camera as there have been a spate of opportunistic home burglaries and car break-ins close to where we live recently. As we were so impressed with the plug and light bulb from a home security perspective, we were excited to see that Hive offer security cameras than can be added to the system.
As we already have a Hive Hub (one is required to attach any of the Hive products) adding a camera wasn’t going to be a problem and we opted for the Hive View Outdoor security camera (we may look at adding the Hive View indoor camera at a later date).
The Hive Hub is the brain of the system for any Hive products and allows you to connect them all up in one place so that you have control over them from a smartphone, tablet or laptop. You can control any of the devices independently, manually or set schedules. The schedules are great for setting things like turning on lights at a specific point in the day, setting the heating to come on just before you get home etc. But the really cool thing that makes the Hive system really smart is that it supports IFTTT (IF This Then That) commands. With IFTTT, you are able to carry out a range of commands, for example if you have a door sensor installed and a light on an active plug you can set a schedule that says if the door sensor detects the door opening the light will turn on – how cool is that?
Anyway, back to the security camera.
The Hive View Outdoor Security Camera comes with:
- Hive Outdoor View Camera
- Magnetic Mount
- 5m Power Cable
- USB Plug
- Screws
- Grommets
- Rawl Plugs
- Cable Clips
- Size 0 Screwdriver
With the weather being terrible lately and us itching to install the camera and try it out, we kept checking the weather app on the phone for a spot where it showed a couple of hours of calmer weather so that we could get outside and fit the security camera.
Before starting, we spent some time deciding where best to site the camera. As it is a security camera that requires permanent mains power (it is not battery operated), it needs to be sited near a power socket (doesn’t need to be too close as it does come with a very generous 7.5 metre power cable). As it is cabled, it requires a hole drilling thorough the wall or door/window frame. So before starting to drill, we spent the time beforehand seeing where best to site it to give the best view of the garden whilst at the same time being close to a power source that made the tidying of the cable easier and neater. It you are not competent at DIY then you can opt for Hive’s installation service (costs £89) and they will do it all for you. We had decided to do it ourselves. We were quite fortunate that where we wanted the camera and where the power outlet was situated inside that there was already an existing hole in the hole from an old aerial cable (and it was just the right diameter), so rather than drilling more holes we used that. If you do need to drill through the wall of your house, you will need an SDS power drill with a 12mm masonry drill bit long enough to drill through an external wall.
If fitting the camera yourself, as we did, you will need some basic tools (other than mentioned above):
- Phillips screwdriver
- Stepladder
- Power drill with a 6mm drill bit
Once we where comfortable with where we were going to site the camera (ideally it has to be at a height of 2 metres plus) and already had a hole in the wall where it was needed, installation was simple. Threading the power cable through the wall was probably the hardest part. We were siting the camera on the wooden pergoda on the back of the house so didn’t need to drill more holes into the stonework of the house for the mounting screw. Once we had the fixed the screw to the woodwork and slid the magnetic mount over the top, the camera just attaches on with a powerful magnet. I was very dubious at first that the magnetic mount wouldn’t be strong enough, especially outside open to the elements, but it survived Storm Dennis without any issues. As the camera is on a magnetic mount it is really easy to position the camera for the best viewing angle. Once the camera was up, all we had to do was screw the cable to wall using the clips provided (you will need a drill and 6mm bit). This as all really simple and the whole installation process took around 15 minutes (this will be slightly longer if you need to drill through the wall into the house). If you are drilling a new hole into the house, it is best practice to drill just below the camera and feed the cable through there, there are two wall grommets included to tidy up the hole.
Now that the camera was installed, cable all neat and tidy and plugged in, we had to pair it to the Hive Hub and add it to the dashboard on the Hive app. This is really simple, just go into the Hive app and add new device, this process took no longer than five minutes.
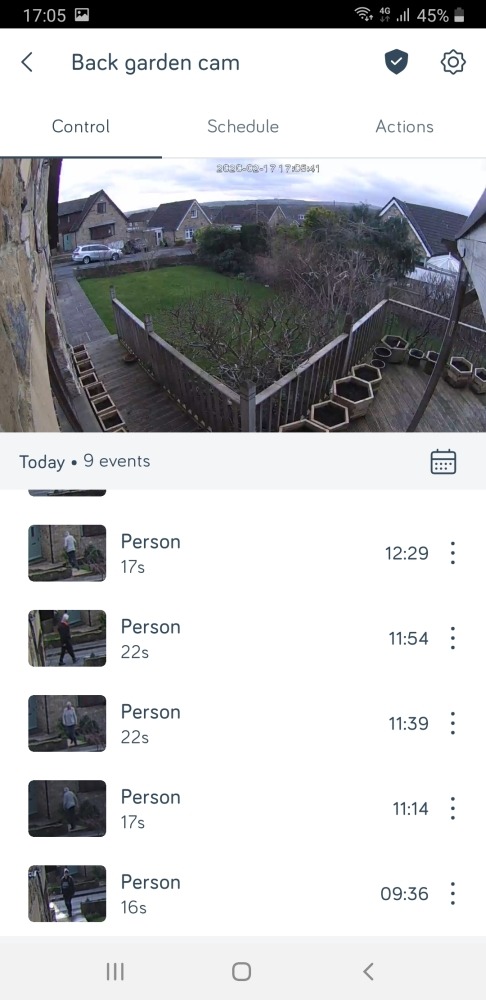
Once installed, you can use the app to view a live feed (open the camera in the Hive app and press ‘Go Live’). You can also view stored recorded clips here. The camera doesn’t have any onboard storage for clips, so you have an option of either going subscription-free and keeping a rolling 24 hours of clips available, or subscribing at £3.99 per month for access to 30 days of clips. Whichever option you pick, you always have the ability to download a clip from the cloud to your phone where you can store it safely, should you need to use it in future.
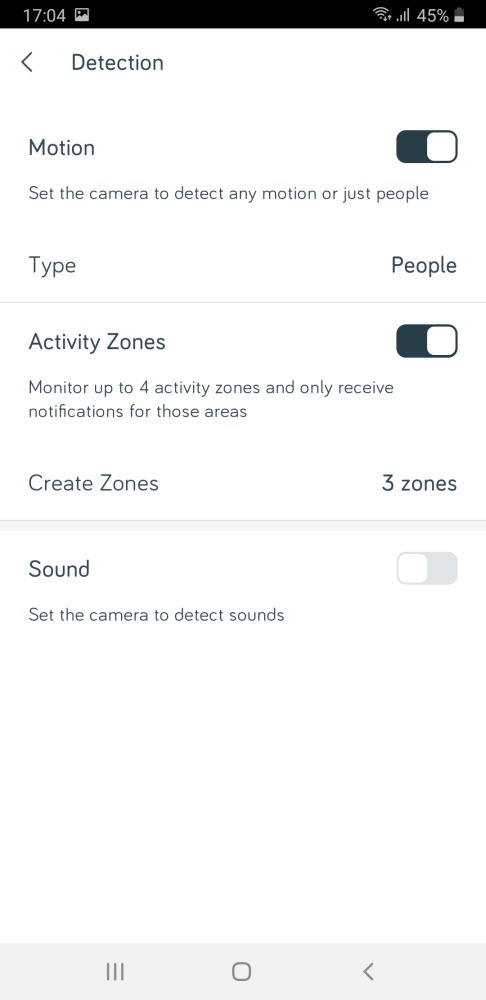
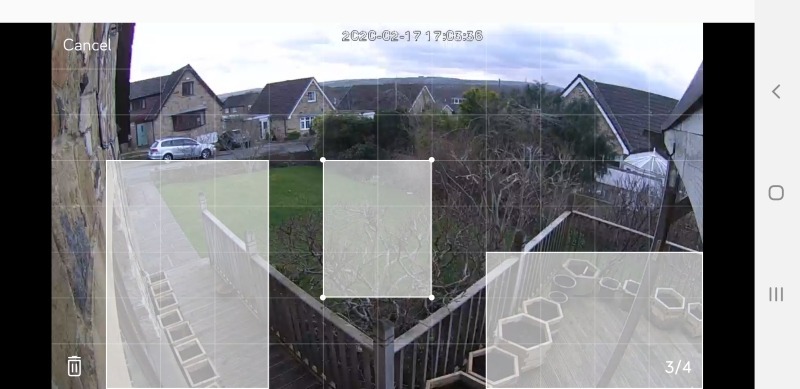
You can change the camera settings from within the app. We found it best to change the motion type to ‘people’ rather than ‘all motion’ as we have lots of trees and shrubs in the garden and the strong wind blowing these was triggering the motion sensors, giving false notifications on the phone. You can also set up to four ‘activity zones’ so that it only triggers the camera for anything in that area (we could see the footpath at the end of the garden and didn’t want motion triggers every time someone walked past the house).
We also turned off the sound detection for now as again the strong winds were triggering it, so we will probably turn this back when the weather is calmer. As well as using sound as a trigger to detect and record an incident, it is also equipped with 2-way communication. If the camera is triggered then you can not only hear what is happening if an intruder is in sight of the camera, but can speak to them too (you could tell them to get off your property or the police would be called or tell the delivery person to leave the parcel by the door).
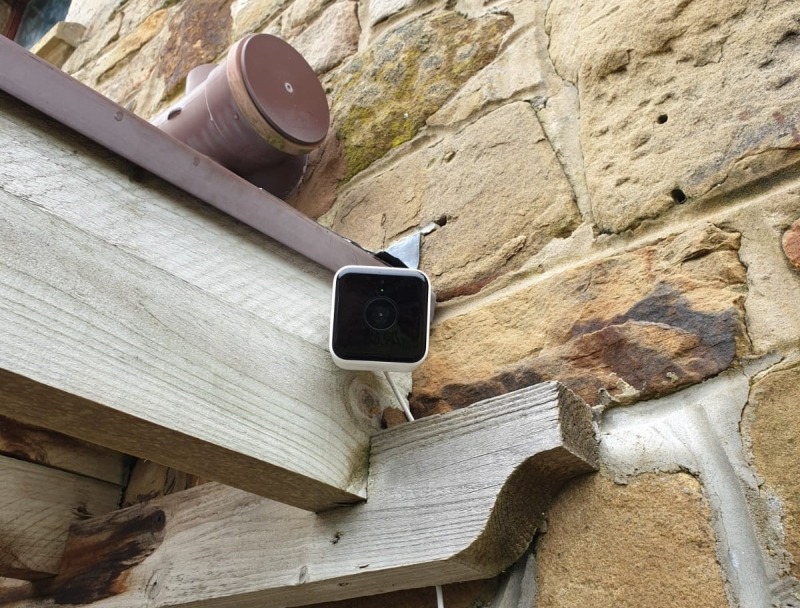
The Hive View Outdoor security camera is a rounded cube shape and looks very good. It attaches to the house with a magnetic mount and can be angled for the best views extremely easily. The build quality seems very high and as already mentioned, it has stood up to Storm Dennis and its driving wind and rain – it hasn’t moved at all. If it even did need to be repositioned for any reason, the magnetic mount means that this can be achieved without the need for any tools. One concern with the magnetic mount was that anyone could come along and knock it off or even steal it! The camera needs to be at a height of 2 metres plus so cannot easily be reached and any thief would need something to stand on the reach it (this would give a very good recording of their face as clips are not stored on the camera). The power cable can not be just pulled out either as it is screwed in place and uses a very tiny screwdriver to tighten/untighten.
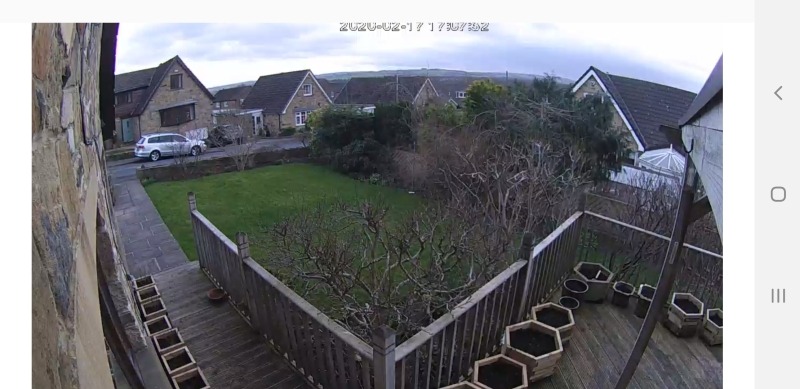
So the camera is situated well, connected to the Hive hub and monitoring the garden and delivering notifications to the phone, what is the quality of the recordings like? I would have to say that the video quality is excellent. It livestreams in 1080p HD (can also be set at 720p if your internet is not up to scratch) with a 130° wide angle lens, person detection, two-way audio and is just as good at night as it is during the day. We can see most of our large quite garden clearly with no significant glare from any street or passing car lights.
With the IFTTT functions of the Hive system, if you have a Hive smart bulb or active plug you can use the schedule in the app to turn on the light, television or radio it the camera detects motion. This function can add another level of security to the house.
Overall, we have been really impressed with the Hive View Outdoor. It is simple and straightforward to install and monitor. Notifications are reliably sent to our phone or tablet whenever motion is detected outside, and having it set to ‘people’ works very well. The quality of the video recordings is excellent and faces can clearly be detected.
Integrating the Hive View Outdoor with our other Hive products is really improving our home security and giving that bit more peace of mind.
UPDATE: Hive no longer sell Hive View cameras.
Rating: 5/5
RRP: £179
For more information or to buy, visit www.hivehome.com.
![]()


