


Helping to support your child’s education at home is something that we all can, and should, do. This doesn’t mean that you have to sit down with textbooks and work through problems with a pen and paper. There are plenty of fun and educational toys and games on the market that can help children learn whilst having fun. When looking for fun educational items, we can all find plenty of fun things to help with phonics, reading, writing, maths etc. but fun science toys and games are a bit harder to come across. We recently had great fun with the Gross Science Thinking Time science kit so were delighted to be try out the Mission to Mars kit. It means that the kids can try something fun during half term and learn something new and different.
The Mission to Mars kit, from John Adams, lets kids explore life on the red planet. It is an activity kit suitable for children 8 years +, under adult supervision. It contains 5 fun activities relating to the planet Mars.
In the box is:
- Mars Scene (plastic tray)
- Parachute Sheet
- Thread
- Plastic sprue containing Mars Rover and meteor parts
- Sand
- Iron fillings
- Rocket and Base
- Green Screen Card (requires app to use)
- Goggles
- Instructions
The kit comes with five different experiments that inquisitive children can do. It enables them to learn about scientific principles whilst playing and having fun. This kit comes with nearly everything that you need to complete the experiments but you will need a few household objects. Extra items needed are:
- Salt
- Water
- Spoon (not a good one from the cutlery drawer)
- Scissors
- Calculator
- Stopwatch
- Soluble Vitamin C tablet
- A willing volunteer
Before we started, we all sat down together to read the instructions and safety advice in the instruction leaflet. The information contained is clear and concise, very easy for all of us to understand. This leaflet also contains some facts about Mars that got the children more excited before we began – did you know that a year on Mars in 687 Earth days?
After reading the instructions and taking heed off all the safety information we were ready to begin. We decided to work through the experiments in order as laid out in the leaflet. The first experiment we attempted was Creating Martian Soil. This will take a few days to complete as it turns the sand into the rusty red surface of Mars.
Experiment 1: Creating Martian Soil
The creation of Martian Soil is easy to complete using sand, iron fillings, salt and water. We added the sand to the Martian Scene plastic tray. Poured the iron fillings on top of the sand and stirred with an old spoon. After that, we added salt (1 teaspoon) into 450ml of water, we stirred until the salt dissolved and then poured a small amount on to the sand (just enough to get the sand wet, but NOT cover it). For now, our little experiment was over as we had to wait for oxidisation to occur. The sand has to be stirred every day and some more of the salt water solution added if the sand is drying out. Kids are impatient and kept checking every few hours to see if anything was happening.
On the third day, the kids were super excited as oxidisation had occurred and we were left with a deep rusty red soil in our tray.
This experiment teaches about oxidisation, rust and what gives Mars its red colour. A good example in the leaflet to explain the effects of oxidisation to children is leaving your bike outside in all weathers and how it starts to get rusty.
The kids were delighted that the first experiment was completed (and the one that took the most time for results). They were fascinated with how the sand changed colour.
Experiment 2: Land Your Mars Rover
We then decided it was time to move onto the next experiment. Like all scientists with an interest in Mars, we had to land our Mars Rover on the newly created red soil.
For this we had to assemble the plastic Mars Rover by pushing the pieces together. We also had to cut out the parachute designs and cut 8 lengths of thread (4x 200mm and 4x 300mm). When we had our parachutes and thread cut to size, the thread had to tied to the parachutes (this can be a bit fiddly so adult help may be required). The Mars Rover is then tied on to the parachute.
The next part will need an adult on hand as it involves standing on a chair to launch the parachute.
With me supporting the chair, one of the children stood on it and starting with the smallest parachute dropped it to the ground. Doesn’t sound like much does it? This is a maths problem, so the experiment needs to be timed from release to landing and repeated a few things and then asking the kids to work out the average freefall time. The same is repeated with the larger parachute. Once the experiments are completed and the average freefall times collected, the children can then see which parachute gives the softest landing.
This experiments teaches maths in the form of averages, teaches how to work out the average on a calculator (or on paper if you want to go old school as we did), it teaches about gravity, surface mass, resistance and speed. What looks like a really basic experiment actually gives a lot of information for the children to process.
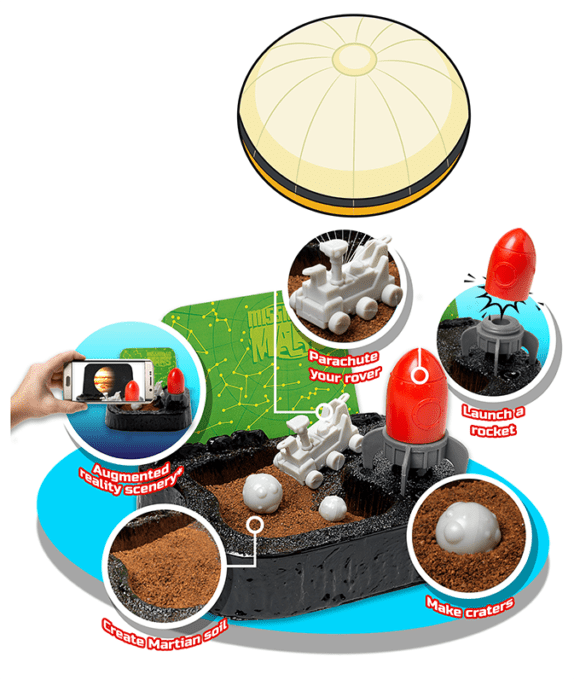
Experiment 3: Create Craters
After a break for lunch, the kids were still wanting to continue with their science experiments. The third experiment is to create craters in the Martian Soil.
We had to remove the meteor pieces from the sprue and push the matching halves together, creating 2 meteors.
This experiment is very easily to do and was the least favourite. For this, drop the meteor onto the Martian Soil and press in to create a crater.
This experiment teaches about force and impact, showing the results in the form of a crater in the soil.
Experiment 4: Launch a Rocket
This was the experiment that the kids were chomping at the bit to try. As we had already read the instructions and were prepared, I had already gone out and bought some soluble Vitamin C tablets.
For this, we had to fill the top of the rocket (red part) with 2 teaspoons of cold tap water. We cut the vitamin tablet in half and dropped it in to the water and very quickly attached the base of the rocket (grey). The rocket is the placed the right way up and we stood back.
For a minute or two nothing happens while the acid in the vitamin tablet reacts with the water. Then it went off with a bang and flew into the ceiling. The kids squealed with delight and despite hitting the ceiling, the sturdy rocket was still intact although we did have water and vitamin tablet everywhere (might be best to do this outside). The rocket can achieve a height of approx. 5 meters.
This experiment will teach about propulsion, in the case the water and acid in the vitamin tablet reacting together to create a gas that builds up in the rocket causing it to lift off (with some force).
Experiment 5: Augmented Reality Scenery
The last experiment is Augmented Reality Scenery and requires a phone or tablet and an app. Unfortunately, the Android version of the app wasn’t available at the time of us using it. We were able to borrow and iPhone (iOS) to try it out with.
The Mission to Mars FX app is free to download and is used with the Green Screen Card that slots onto the back of the Mars Scene plastic tray. Once the app is downloaded and installed, on opening you are greeted with 2 options – Greenscreen or No Greenscreen.
Greenscreen is used with the Greenscreen card and you have four different options to use (meteor and planet scenes). When you point your phone or tablet at the greensceen, the screen option you select is overlayed on the image of the green card on the screen allowing you to create your own Mars scene and record your own videos.
When no greenscreen is used you have the same four scene options with spinning planets and a rocketship that you can move, you cannot record this as a video.
This experiment is for creating your own videos, setting scenes and using your imagination to make your own film. The kids have spent ages with this, recording the Mars Rover on the Martian Soil, dropping in the Mars Rover parachute and launching their rocket, creating their own mini stories which they can record and play back.
Overall, the kids loved this fantastic kit, although the crater making wasn’t of that much interest to them. The rocket was definitely the highlight followed by the augmented reality. Taking away the initial three days for the soil to turn red, we spent a good few hours with the kit. The augmented reality will add a good few more.
Even after the experiments are completed, the kids continue to ask questions – some that I know the answer to and others we have to Google (although we are using this to learn how to do internet searches and research information).
I would really recommend Mission to Mars as a fantastic activity. It is also fun and educational – sparking an interest in Mars, space and general science (hopefully this is something they will keep up).
Mission to Mars is an excellent set to support education at home without making the kids feel like that they are in a classroom.
Rating: 5/5
RRP: £12.99
For more information, visit www.johnadams.co.uk. Available to buy from Amazon here.
![]()


